The following is the instructions how to setup the XEP Core CLI Wallet (command line interface) on a NAS such as Synology Diskstation, QNAP, or any Linux OS based distribution. This installation uses no GUI (graphical user interface).
Setup XEP Core CLI Wallet on a NAS or Linux system
Requirements for the CLI Wallet installation:
- It is recommended to have at least 1Gb RAM on the system to run the software.
- The installation should work on any 32bits core processor or 64 bits core processor.
- It is supposed that you have preliminary knowledge regarding NAS configuration and SSH.
Installation Considerations
The software setup has been tested on a NAS Synology DS218+ DSM 7.0 with more than 4Gb RAM. (Synology DS218+ is an Intel 64 bits core processor). It was also previously working on a Synology DS214+ DSM 6.2.4 with 1Gb RAM (arm 32 bits processor). For the installation please enable SSH access, and ensure you access with ssh using your account.
- Recommended: Ensure your NAS or OS system is up to date.
- Access your account using SSH (Putty, MobaXterm, Linux terminal are good client apps)
Quick Installation for Experiences Users (Using 1 Wallet Address)
The below steps are all the steps described and explained during the next parts of this document. I recommend you to read at least once, all the detailed steps, and once you become familiar, you may only check this section as a reminder for all the steps.
- cd && mkdir -p crypto/xep && cd crypto/xep
- wget [download link of the CLI asset, available assets in github]
- tar -xvf [filename of the CLI asset]
- rm [filename of the CLI asset]
- chmod +x xepd xep-cli
- ./xepd -daemon [(./xep-cli stop) to stop XEP Core daemon]
- tail ~/.xep/debug.log -f [to check logs, Ctrl+C to quit]
- (mkdir ~/.xep/wallets/wallet_name)
- [put you wallet.dat file in ~/.xep/wallets/wallet_name/] or [create wallets subfolders structure]
- ./xep-cli loadwallet wallet_name true [to load the wallet persistently]
- [Create unlockwallet.sh file (details in §5), that will allow to unlock your wallet securely]
- ./unlockwallet.sh [enter the wallet password]
- you are done: your wallet is unlocked and staking, running 24/7.
For those users who need more detailed installation instructions, please follow the following steps 1 to 8.
Step 1) Install XEP Core Daemon & CLI Software
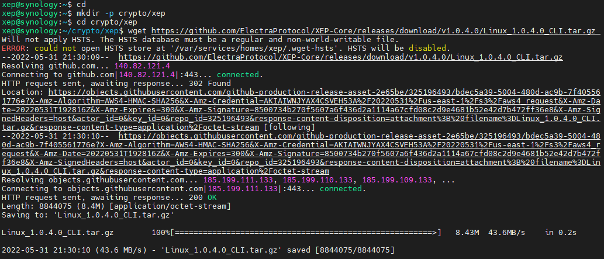
Let’s create the directory where xep-cli and xepd will be installed. You may change the directory if you prefer to have a personalized directory for it. Perform the following command lines, knowing that in this tutorial, I will use the folder with subfolder crypto/xep in the home directory, and Linux CLI 1.0.4 for 64 bits processor:
- cd
- mkdir -p crypto/xep
- xep-cli and xepd will be installed in ~/crypto/xep, where ~ is your home directory.
Check Whether Your Processor Is 32 Bits or 64 Bits
- Check on your NAS specifications website
- Or check directly on your NAS OS dedicated application
- Or use the command “uname -m”, directly on your secured shell
- If result is x86_64, then it is 64 bits
- If result is i686 or i386 or armvx, then it is 32 bits
Identify the Required Wallet (Download Latest Version)
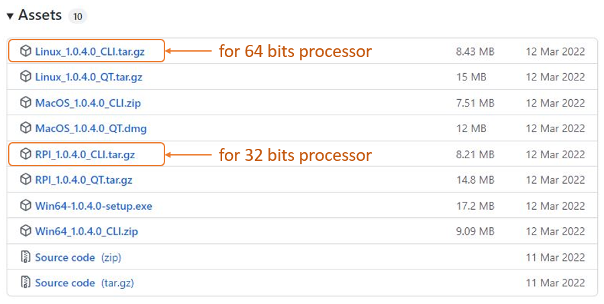
- For the 64 bits version, choose Linux_[x.y.z.a]_CLI.tar.gz
- For the 32 bits version, choose RPI_[x.y.z.a]_CLI.tar.gz
Download and Unzip Wallet via Command Line (Option 1/2)
From your NAS ssh terminal:
- cd ~/crypto/xep (from the assets github page, copy the URL download address, right-click on it and copy link)
- wget [copy the download link]
Assumed download link: https://github.com/ElectraProtocol/XEP-Core/releases/download/v1.0.4.0/Linux_1.0.4.0_CLI.tar.gz
Assumed filename is: Linux_1.0.4.0_CLI.tar.gz
wget https://github.com/ElectraProtocol/XEP-Core/releases/download/v1.0.4.0/Linux_1.0.4.0_CLI.tar.gz
- tar -xvf Linux_1.0.4.0_CLI.tar.gz xepd xep-cli (change to the appropriate filename, updated version or RPI…)
Download Wallet to Computer (Option 2/2)
- Download the required version on your local computer,
- unzip/untar it using a known application,
- then place both files xep-cli and xepd on the ~/crypto/xep remote directory (using scp, sftp, ftp, smb shares, or any other available method with your NAS)
Optional: The file downloaded can now be deleted: rm Linux_1.0.4.0_CLI.tar.gz
Enable xepd and xep-cli to be executables: chmod +x xepd xep-cli
Step 2) Start/Stop XEP Core
In the next step, we are launching the wallet software.
Starting xepd (XEP Core Daemon)
./xepd -daemon

Watching Logs
XEP Core started, you may anytime verify what is going on by launching the tail command for the debug.log file.
tail ~/.xep/debug.log -f
Press Ctrl+C to quit this command.
Stopping XEP Core Daemon
To stop the XEP Core wallet, run these commands:
cd ~/crypto/xep
./xep-cli stop

Step 3) Import Your Wallet
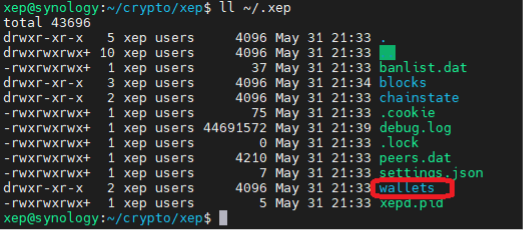
The folder and subfolders ~/.xep/… have been created, we can now import our existing wallet.dat.
Each wallet.dat has to be put in a subfolder within the folder named “wallets”. The wallets directory is
~/.xep/wallets
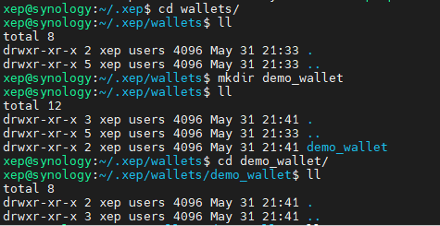
The structure should be as follow (knowing that each subfolder wallet_name can have any other name). If your backup is the wallets folder itself, just replace the wallets folder entirely.
Now creation of a wallet sub folder (here “demo_wallet”):
mkdir ~/.xep/wallets/demo_wallet
Now copy any backup of your wallet.dat into this folder (using sftp, scp, smb shares or any other method available with you NAS).
Step 4) Load Your Wallet
For the below steps, ensure XEP Core is running. We will consider the wallet imported in the previous section:
cd ~/crypto/xep
./xep-cli loadwallet demo_wallet true
Explanation of terms:
./xep-cli loadwallet = the cli command to load a wallet
demo_wallet = name of your wallet (the folder within the wallets folder)
true = the wallet will be automatically loaded each time on xepd startup
Your wallet will now be loaded automatically each time xepd starts. This step just needs to be done once for each wallet.
Step 5) Unlock Your Wallet
Unlocking your wallet is necessary to participate in the staking process of XEP coins. You will have to unlock your wallet each time the core wallet (xepd) is restarted, using this unlockwallet.sh executable. The following command is used to unlock the wallet and enable staking:
./xep-cli walletpassphrase $password 0 true
In this example, $password is your wallet.dat password.
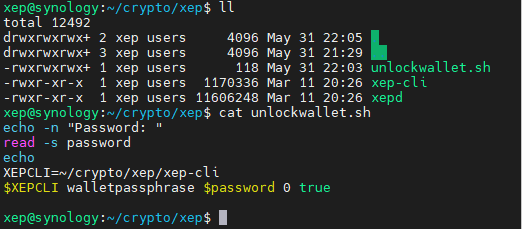
In order to avoid writing it clearly in a command line, I highly recommend to create the following script file: unlockwallet.sh, which the content will be:
echo -n "Password: "

read -s password

echo

XEPCLI=~/crypto/xep/xep-cli

$XEPCLI walletpassphrase $password 0 true
There are several ways to create this file, for example by using a text editor like nano or vim. (If you are not familiar with vi, consider browsing the crypto/xep folder remotely, then create the file remotely). To create the file using the editor vi, enter this:
vi unlockwallet.sh
Explanation of steps:
– when you entered the editor, click “i” (INSERT mode is enabled), copy the 5 lines above and paste it on the vim editor (mouse middle click, or right click then paste option)
– click “Escape” button (INSERT mode is disable)
– write “:wq!” (write and quit with no confirmation) then press “Enter”
After you created the file, make sure to allow the file to be executed:
chmod +x unlockwallet.sh
./unlockwallet.sh
You are prompted for your password, which won’t be displayed, neither recorded. If no error messages appear, your wallet is now unlocked and staking (congratulations).
You may check your stakes using XEP desktop wallet on any computer, with the same wallet.dat (no need to unlock it on the desktop wallet), or on the Electra protocol explorer, searching your address.
Step 6) Useful Commands
The following commands are useful when dealing with the wallet:
./xep-cli getwalletinfo
./xep-cli getbalance
./xep-cli getbalances
./xep-cli help
./xep-cli getmininginfo
./xep-cli getconnectioncount
./xep-cli listtransactions
./xep-cli listaddressgroupings
Step 7) Simplifying Things
For advanced users: Add all these aliases in a file that is automatically loaded at startup / terminal session. (the bash_profile file loaded automatically by your system might differ). The bash profile file shall contain all these aliases, and if relevant the XEPDIR variable.
#~/.bashrc personal .profile file for ash.
XEPDIR=~/crypto/xep
alias xepcli=”$XEPDIR/xep-cli”
alias startxep=”$XEPDIR/xepd -daemon”
alias stopxep=”xepcli stop”
alias xepstart=”startxep”
alias xepstop=”stopxep”
alias xepmining=”xepcli getmininginfo”
alias xeptaildebugfile=”tail ~/.xep/debug.log”
alias xepwallet=”xepcli getwalletinfo”
alias xepbalance=”xepcli getbalance”
alias xepunlock=”$XEPDIR/unlockwallet.sh”
alias xeplock=”xepcli walletlock”
Step 8) For Multi Wallets
For advanced users: In case you want to host several wallet.dat files, this section describes the additional steps to configure it.
~/.xep/wallets folder shall have one subfolder for each wallet.dat
Examples:
~/.xep/wallets/wallet1/wallet.dat
~/.xep/wallets/wallet2/wallet.dat
~/.xep/wallets/wallet3/wallet.dat
Each wallet will have to be loaded manually (once):
./xep-cli loadwallet wallet1 true
./xep-cli loadwallet wallet2 true
./xep-cli loadwallet wallet3 true
Each wallet shall be unlocked one by one, and I recommend creating one unlockwalletX.sh for each file, the only difference is on line 5, where wallet must be specified:
For unlockwallet1.sh :
$XEPCLI -rpcwallet=”wallet1″ walletpassphrase $password 0 true
For unlockwallet2.sh :
$XEPCLI -rpcwallet=”wallet2″ walletpassphrase $password 0 true
For unlockwallet3.sh :
$XEPCLI -rpcwallet=”wallet3″ walletpassphrase $password 0 true
To run the useful commands, you must specify the wallet (same for the aliases if using them):
./xep-cli -rpcwallet=”wallet1″ getwalletinfo
./xep-cli -rpcwallet=”wallet1″ getbalance
